Save Space on Your Hard Disk When Ripping
Do you like to rip (copy) music from CDs but you’re worried about using up hard disk space on your computer? In Windows Media Player, you can pick from several audio formats and a range of file sizes to find the combination of quality and file size that works for you.
If you aren’t sure which format to pick, listen to how the formats sound at the Audio Quality Web page. Or, try ripping some songs with different formats and sizes until you find the combination that works best for you.
To set the level of recording quality:
1. In Windows Media Player, click the Access applications menu button, point to Tools, and then click Options.
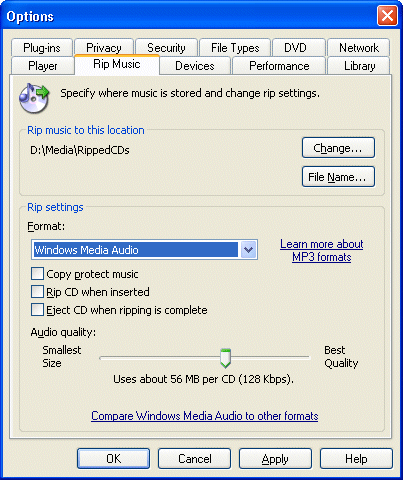
2. Click the Rip Music tab, shown in the following screen shot.
2. Click the Rip Music tab, shown in the following screen shot.

3. Under Rip settings, select one of the following formats:
- Windows Media Audio. The most common format, it provides the widest range of quality and size choices.
- Windows Media Audio (variable bit rate): This choice provides overall higher quality than Windows Media Audio format, but the size will vary according to the complexity of the audio.
- Windows Media Audio Lossless. Select this option if you want the audio quality to be as close as possible to the original. Size savings will be the least of the three formats, and will vary according to the complexity of the audio.
- MP3 format. New in Windows Media Player 10, MP3 provides more flexibility when choosing a format.
4. Adjust the Audio quality slider to the left to use the least amount of your hard disk, and move the control to the right to obtain the best-quality audio.
